
A calm, plain-English tour of your website’s control center, so you always know where you are and what each part does.
Your WordPress dashboard is the control center for your whole website. Once you understand how it is laid out, every task that follows becomes far less intimidating.
This guide gives you a clear tour of the dashboard. By the end, you will recognize the three main areas of the screen, understand every item in the main menu, and know how to tidy the dashboard so it shows only what you need.
What the Dashboard Is (and What It Is Not) #
The dashboard is the private admin area of your website. It is the screen you land on right after you log in at yourbusiness.com/wp-admin.
Your Website Has Two Sides #
Every WordPress website is really two things at once. Knowing the difference removes most of the confusion beginners feel.
The Front End #
The front end is the public website your visitors and customers see. It includes your home page, your blog posts, your product pages, and your contact form. Anyone with your web address can view it.
The Back End #
The back end is the dashboard. It is the staff-only area where you build and manage the front end. Only people with a login can reach it. Think of a stage play: the front end is the performance the audience watches, and the back end is everything happening backstage to make that performance happen.
Why This Matters for You #
When you make a change in the dashboard, you are working backstage. Nothing becomes visible to visitors until you click a button like Publish or Update. That means you can explore, edit, and experiment in the dashboard without worrying that visitors see half-finished work.
Browsing around the dashboard is safe. Reading screens, opening menus, and looking at settings does not change your live website. Changes only happen when you actively save, publish, or delete something.
How to Reach Your Dashboard #
To open the dashboard, go to your website address and add /wp-admin to the end, then sign in with your username and password.
If you are not sure how to sign in, read the companion guide How to Log Into Your WordPress Dashboard first, then come back here.
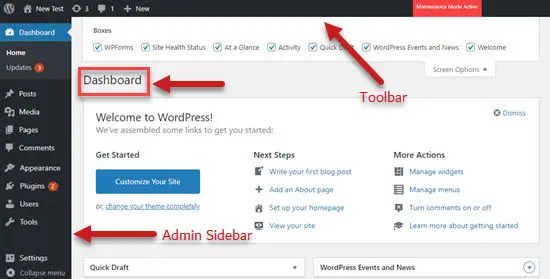
The Three Main Areas of the Screen #
No matter which theme or plugins you use, the dashboard is always divided into the same three zones. Learn these three and you can find your way around any WordPress site.
The Admin Bar (Top Toolbar) #
The admin bar is the thin dark strip across the very top of the screen. It stays with you everywhere, even when you are viewing the public side of your site while logged in.
What You Will Find in the Admin Bar #
- Your site name, on the left. Click it to jump between the dashboard and the public view of your site.
- A plus or New button to quickly create a new post, page, or other item.
- A comments icon showing items waiting for your review.
- Your account menu, on the right, where you edit your profile or log out.
The Main Menu (Left Sidebar) #
The main menu runs down the left-hand side. This is the heart of the dashboard and the place you will use most. Each item opens a different part of your site, such as pages, posts, or settings.
How the Menu Expands #
Hover your mouse over a menu item, and a sub-menu slides out with more choices. For example, hovering over Posts reveals All Posts, Add New, Categories, and Tags. Click the main item to open its first screen, or click a sub-item to go straight to it.
The Work Area (Center) #
The work area is the large space in the middle. Whatever you click in the left menu opens here. When you first log in, this area shows the dashboard home screen with a few summary boxes.
Screen Options #
In the top-right corner of many screens, you will see a Screen Options tab. Click it to show or hide boxes and columns, so you can keep each screen as simple or detailed as you like.
The Help Tab #
Right next to Screen Options sits a Help tab. Click it for short, built-in explanations of whatever screen you are on. It is a handy first stop when something is unclear.
The Main Menu Items Explained #
Here is what each standard item in the left-hand menu does. Your site may show extra items added by plugins, which is normal and covered further below.
Dashboard #
The Dashboard item takes you to the home screen with your summary boxes. It also holds Updates, where WordPress lists new versions of the software, your theme, and your plugins.
Posts #
Posts are your blog entries: dated, regularly published articles such as news and how-to pieces.
When to Use Posts #
Use Posts for content that is part of a stream and benefits from a date, like a weekly update or an announcement. Posts can be sorted into categories and tags so readers can browse by subject.
Media #
Media is your library of uploaded files: images, PDFs, and videos. Anything you add to a page or post is stored here so you can reuse it later.
Pages #
Pages are the fixed, standalone parts of your site, such as Home, About, Services, and Contact.
Posts Versus Pages #
The difference trips up many beginners, so here is a simple comparison.
| Feature | Posts | Pages |
|---|---|---|
| Best for | Blog articles, news, updates | Home, About, Contact, Services |
| Have a date | Yes, shown by date | No, considered timeless |
| Use categories and tags | Yes | No |
| Appear in your blog feed | Yes | No |
A useful analogy: Pages are the rooms of your house that stay put, while Posts are the daily newspaper that arrives and stacks up over time.
Comments #
Comments is where you read, approve, reply to, or remove messages that visitors leave on your posts. Approving a comment makes it visible to the public.
Appearance #
Appearance controls how your site looks.
What You Will Find Inside Appearance #
The exact sub-items depend on your theme, but you will usually see the following.
Themes #
A theme is the design template that sets your site’s overall look. This screen lets you view and switch themes.
Customize or Editor #
This is where you change colors, fonts, your logo, and layout options. Newer themes use an Editor, while many classic themes use a Customize screen.
Widgets and Menus #
Widgets are small content blocks you can place in areas like sidebars and footers. Menus is where you build your site’s navigation links.
If your site was built with Elementor, much of your design work happens inside the Elementor editor rather than these screens. See the Working With Elementor guides for that workflow.
Plugins #
Plugins are add-ons that give your site new features, such as a contact form, an SEO tool, or a backup system. This screen lists what is installed and lets you activate, deactivate, or update each one.
Users #
Users lists everyone who can log in to your site. Here you add team members, set their roles, and remove people who no longer need access.
Tools #
Tools holds occasional-use utilities, such as importing content from another site or exporting your content as a backup file.
Settings #
Settings is the master configuration area, covering your site title, time zone, and how your web addresses are formatted.
Settings controls how your whole site behaves. Read each screen carefully before changing it, and avoid editing options you do not recognize.
WooCommerce and Other Plugin Menus #
When you run an online store, WooCommerce adds its own menu items, usually WooCommerce and Products, for managing orders, payments, and your catalog. Many other plugins add menu items too. Seeing extra items in your menu is completely normal and simply means a plugin is active.
The Dashboard Home Widgets #
The home screen greets you with a few summary boxes, called widgets. The most useful ones are below.
At a Glance #
At a Glance gives a quick count of your posts, pages, and comments, and tells you which theme and WordPress version you are running.
Activity #
Activity shows your most recent posts and the latest comments waiting for review, so you can act on them fast.
Quick Draft #
Quick Draft lets you jot down a rough blog post idea on the spot and save it as a draft to finish later.
How to Tidy Up Your Dashboard #
A busy dashboard can feel overwhelming. You can simplify it in two quick ways.
Using Screen Options #
Click the Screen Options tab in the top-right corner, then untick any boxes you do not want to see. The dashboard updates instantly, and your choices are remembered for next time.
Rearranging the Boxes #
You can drag each widget box by its title and drop it where you prefer. Put the boxes you use most at the top so they greet you the moment you log in.
When you reload the dashboard, your hidden boxes stay hidden and your rearranged boxes keep their new positions.
Frequently Asked Questions #
Will I Break Something by Clicking Around? #
No. Opening menus and reading screens is safe. Your live site changes only when you actively publish, update, or delete content. Explore with confidence.
Why Does My Dashboard Look Different From a Tutorial? #
Your theme and plugins can add or rename menu items, so two WordPress sites rarely look identical. The three main areas, the admin bar, the left menu, and the central work area, are always the same, which is why this tour still applies.
What Are the Numbered Circles Next to Menu Items? #
Those small circles are notification badges. They tell you something needs attention, such as available updates next to Plugins or comments waiting next to Comments.